PetaPixel

Installation of Moodle on Ubuntu 14.04

 tháng 5 30, 2014     Moodle, Ubuntu 14.04     No comments   

Install Apache/MySQL/PHP

sudo apt-get update
sudo apt-get install apache2 mysql-client mysql-server php5

sudo apt-get install graphviz aspell php5-pspell php5-curl php5-gd php5-intl php5-mysql php5-xmlrpc php5-ldap
sudo apt-get install git-core

Restart Apache
sudo service apache2 restart

Download Moodle
cd /opt
sudo git clone git://git.moodle.org/moodle.git
cd moodle
sudo git branch -a
sudo git branch --track MOODLE_27_STABLE origin/MOODLE_27_STABLE
sudo git checkout MOODLE_27_STABLE


Copy local repository to /var/www/html/
sudo cp -R /opt/moodle /var/www/html/
sudo mkdir /var/www/moodledata
sudo chown -R www-data /var/www/moodledata
sudo chmod -R 777 /var/www/moodledata
sudo chmod -R 0755 /var/www/html/moodle


Setup MySQL Server
sudo gedit /etc/mysql/my.cnf
Add following lines under Basic settings section.

default-storage-engine = innodb

Save and close the file.

Restart MySQL
sudo service mysql restart

Create the Moodle MySQL User

mysql -u root -p

mysql>

CREATE DATABASE moodle DEFAULT CHARACTER SET utf8 COLLATE utf8_unicode_ci;

mysql>

GRANT SELECT,INSERT,UPDATE,DELETE,CREATE,CREATE TEMPORARY TABLES,DROP,INDEX,ALTER ON moodle.* TO moodle@localhost IDENTIFIED BY 'moodle';

mysql>

quit;
Complete Setup
sudo chmod -R 777 /var/www/html/moodle
Open your browser and go to http://127.0.1.1/moodle
After you have ran the installer and you have moodle setup, you NEED to revert permissions so that it is no longer writable using the below command.

sudo chmod -R 0755 /var/www/html/moodle

Reference: Moodle Documentation
Read More
  • Share This:  
  •  Facebook
  •  Twitter
  •  Google+
  •  Stumble
  •  Digg

Display panel problems on HP Officejet 8600 printers

 tháng 5 27, 2014     HP Officejet     No comments   


The LCD touchscreen display is very light, blank, unreadable or broken...


Solution 1:
  • Unplug the power cable from the printer and the wall.
  • Wait 10 minutes.
  • Plug the printer back in directly to a wall outlet.

Solution 2: (for a blank screen)
  • Unplug the power cord.
  • Wait for 2 minutes
  • Plug in the power cord and power on the printer
  • Wait for the printer to enter ready mode
  • Download and install the latest Firmware from HP.com for your model:
  • http://www8.hp.com/us/en/support-search.html?tab=1#/qryterm=officejet%20pro%208600e%20all%20in%20one...

Solution 3:
  • The product display is blank or black.


Solution 4: you have to replace the Display Control Panel.

  • For HP Officejet 8600 series, the part number of the Display Control Panel is  CM749-60021:


  • For HP Officejet 8500, 8500a series, the part number of the Display Control Panel is  CM758-60006:


Read More
  • Share This:  
  •  Facebook
  •  Twitter
  •  Google+
  •  Stumble
  •  Digg

Creative Licences and Displaying Models at Shows

 tháng 5 24, 2014     No comments   

We learn about Creative Commons in school but big 3D printing companies don't seem to comprehend it. There have been a lot a cases of big 3D printing companies stealing a design from a small 3D designer. This issue was first discussed at 3DPI in October 2012, when Dizingof first had his designs used without his consent by Tri-Tech 3D and PP3DP. They have apoligized and have given recognition to him. 

This entire situation was started when designers started offering free designs on sites like Thingiverse and GrabCad under a Creative Commons attribution non-commercial license. Big 3D printer companies have been violating these licenses. The only way people can try to stop them is using social media because big 3D printing companies have enough money to fend off your (small-time) lawyer when you issue a DMCA.

(Source)

Recently, Makerbot contacted us about an opportunity to showcase student designs at the upcoming ISTE conference. but assures us that "Your school/student would be credited with a plaque." Nicely done.

Also, on Thingiverse, you are given the option to "give a shout out."  With a click of the button, you can get a tag to print (see image below) to give credit where credit it do.  (In Creative Commons land, we call this attribution.)


- by Sam (newly 8th grade)

Read More
  • Share This:  
  •  Facebook
  •  Twitter
  •  Google+
  •  Stumble
  •  Digg

Add Google Input Tools extension on Chrome browser

 tháng 5 24, 2014     Google Chrome, Input Tools, Languages, Malayalam     No comments   

Google Input Tool is helpful to type various languages without any hassle. Google Input Tool now has Chrome browser extension. User can type regional languages without leaving Chrome browser. You can add Google Input tools extension from this link,

The Google Input Tools extension provides virtual keyboards for over 90 languages, full IMEs or direct transliteration for over 30 different scripts, and handwriting input for over 40 languages.

Install Google Chrome
Download Google Chrome from the official website. Download .deb package for Ubuntu users.

Install Input Tools extension
Go to Google Chrome > Settings > More tools > Extensions > Get More extensions
Search, find and install Google Input Tools extension.

How to enable your regional language
Google Input Tools extension appear on browser page.


Click on the Google Input Tools extension button and select Extension Options.
Select your languages and close the window.

You can type your language in any browser based applications (e.g. Facebook).
Read More
  • Share This:  
  •  Facebook
  •  Twitter
  •  Google+
  •  Stumble
  •  Digg

Maker Faire was a success (and fun!)

 tháng 5 23, 2014     3D-Events, Our BPC Story     No comments   

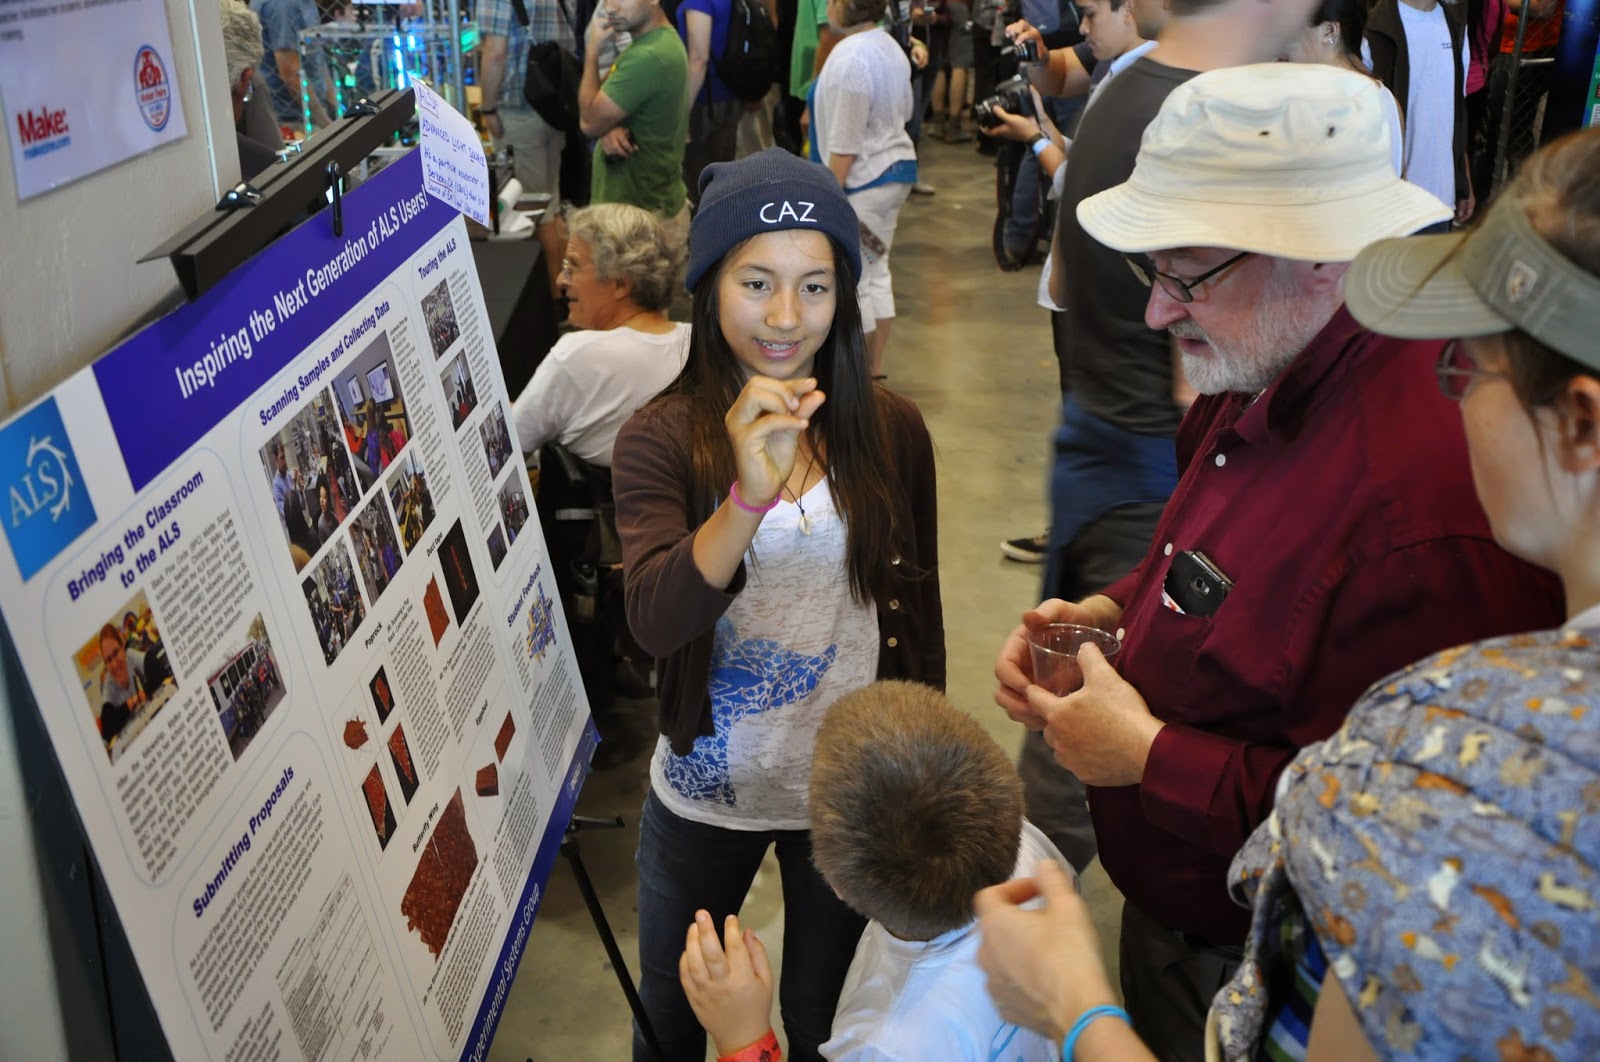
The BPC Maker Club had a booth at the San Mateo Maker Faire last weekend, showcasing the work of the 7th grade science class: 3D printing data scanned at the Advanced Light Source.  (For more information, you can read more about the original project, follow the latest ALS-tagged blog posts on our Maker Club blog, or read the most recent ALS news feature.)


The Maker Faire is a "a family-friendly festival of invention, creativity and resourcefulness, and a celebration of the Maker movement" and this year's flagship faire brought together over 1100 makers of all ages.   The Maker Club was thrilled that we were placed in the 3D printing section rather than in the Young Makers tent.  We don't know why this happened, but it gave the students an opportunity to network with some big names in 3D printing such as Formlabs, Ultimaker and Type A Machines.  In fact Sam, a 7th grader, was even inspired to engage eight different companies in a friendly competition of printing our eggshell file!


We are also grateful to Brook Drumm, Founder of Printrbot, for generously donating a new Printrbot Simple to us just a few days before the faire.  Brook was the one who helped us get started with 3D printing back in December 2011, and it is always a pleasure to stop by his booth and hear about what he is working on next!

Sam, Brook Drumm, Alexander

The kids did a great job and were awarded an "Editor's Choice" blue ribbon for demonstrating great creativity, ingenuity and innovation, and a "Best in Class" red ribbon in the Education division.


Congrats to the entire 7th grade class for the recognition of their work, especially to Flynn, Abe, Alexander, Jane, Daniel, Sam, Kyra and Emily, who worked the Maker Faire booth.  (Also, a shoutout to Gigi, Alex, and Luka (all 6th grade) and Isaac (8th grade) for showing up as representatives of Maker Club!)


Here are just a  couple of pictures from the faire.  Please visit our Flickr page (tag: makerfaire) for more!


And finally, it was exciting to have three functional 3D printers up and running all at the same time.  


If you find 3D printers as fascinating as we do, you may want to follow out our blog(see the right nav bar to enter your email address), "like" us on Facebook, or follow us on Twitter!

Read More
  • Share This:  
  •  Facebook
  •  Twitter
  •  Google+
  •  Stumble
  •  Digg

3D Printer Test

 tháng 5 22, 2014     3D-Events, ALSproject, Cool Printed Stuff, Hardware and Materials, Scanning, Stuff We Print     No comments   

The recent Maker Faire provided our Maker Club an opportunity to meet and collaborate with the leading 3D Printer manufacturers in the world. We saw this as an opportunity to test their print quality on a hard challenge.

When we were at the ALS (read about it here), we scanned an eggshell and created an STL file with the data.  We asked several 3D-printer manufacturers to print the eggshell blown up about a thousand times.


The companies were excited to help out.  We had the eggshells printed on, from left to right (starting with the top row): the UP Plus 2, Cube 2, Afinia, Ultimaker 2, Printr Bot Simple Metal (using Microsoft's new slicer), RoBo 3D, MakerBot Dual, Form 1, and a Printr Bot Simple Metal (using Slic3r).

We were very impressed by the results -- they were far better than we could obtain from our old printers.

The Printrbot Simple metal has the best value for it's price. I recommend using the Microsoft slicer with it because Slic3r isn't the best at closing holes in the data. The Printrbot also has the standard 100 micron resolution.

For the best quality that isn't SLA, I would rank the Afinia and the UP Plus 2 at the top. They both have outstanding XY quality and have no excess bridges like the Cube 2. They are very similar in price, with each costing about $1,600. If you want a mid-ranged consumer 3-D printer, I would definitely recommend one of these.

The Type A machine is almost as good as the Afinia but it creates more bridges. I don' think the bridges would be a problem for less complicated prints, but for something in our experiments, it produced a lesser quality print than similar printers.

The Form 1 has the best quality. You can only barely see the layers because SLA printer's levels bond more closely together.  One downside to the Form 1 is that its post processing takes an extra 30 minutes to finish the job. The post-processing includes dipping it in rubbing alcohol, so it isn't the best for schools (at least yet). The other downsides are its cost ($3299) and supports. The supports leave marks on the bottom of your print but you can scrape them off very easily.  Bottom line: if you are looking for stunning quality, it is hard to beat on the consumer market.

Of course, our experiment was not perfect. We did not always control for slicing software, type of filament, etc. but we think it gave us some pretty interesting results anyway.

On the whole, we were grateful to the manufacturers and very happy with the results of this challenging test. If you are a printer manufacture and would like a full review of your product, email us.
Read More
  • Share This:  
  •  Facebook
  •  Twitter
  •  Google+
  •  Stumble
  •  Digg

How to solve error code 5,156,61 on Canon printers

 tháng 5 20, 2014     canon, Error code     No comments   


You can have error code 5,156,61 on these Canon printers: MG2100, MG2120, MG2150, MG6250, MX375, MX360, MP495, MP230 etc...

It usually concerns the scanner: "Code:5,156,61 Cannot scan for these reasons: -Scanner is turned off.-USB cable is disconnected"


Solution 1: check USB connection
  • Try another USB port on the PC
  • If USB cable is connected to an USB Hub: connect diretly the cable to the PC.
  • Try another USB cable

Solution 2:
  • Sometimes, an antivirus or the firewall of Windows can block the use of Canon software.
  • Check this point by disabling them temporarily.

Solution 3:
  • Reinstall the drivers of the printer


Read More
  • Share This:  
  •  Facebook
  •  Twitter
  •  Google+
  •  Stumble
  •  Digg

How to fix error 5B00 for Canon MX320 printer

 tháng 5 20, 2014     Canon MX, Error code     No comments   


MAJ 04/02/16
Here is the solution to fix error code 5B00 or to reset waste ink counter for Canon MX320 printer.


Solution 1:
  • Turn off the printer
  • Press and hold the "Stop/Reset" button
  • Press and hold "Power On" button
  • While holding the "Power On" button, release the "Stop/Reset" button
  • While holding still the "Power On" button, press twice the "Stop/Reset" button
  • Release the "Power On" button
  • Wait until it display an "idle" message. It will take about 60 seconds.
  • When "idle" appears, open the top cover to expose the cartridges.
  • Lift up the cover for cartridge holder and take out both the black and color cartridges
  • Return the cover of cartridge holder and turn off the printer
  • Return the top cover and turn on the printer again
  • After the printer initialize, return the cartridges.

Solution 2:
  • Service tool V3400 for resetting Canon printers counter
    Read More
    • Share This:  
    •  Facebook
    •  Twitter
    •  Google+
    •  Stumble
    •  Digg

    Student's Reflections on the Bay Area Maker Faire

     tháng 5 20, 2014     3D-Events, Our BPC Story     No comments   

    Alexander (7th grade) -  I thought the Maker Faire was a huge success. Our booth attracted lots of attention, and we got to meet all kinds of cool and interesting people who stopped by. But our booth wasn't the only good one. After looking around the faire

    Jane (7th grade) - The Maker Faire was amazing! Having our own booth was really fun, and there were lots of interesting people who came to look at it. I got to look around the Faire too, and all the booths had amazing stuff!

    Abe(7th grade)- The maker faire was a very fun and interesting experience. Having a BPC booth was cool because we got to meet lots of interesting people. Walking around the faire was also fun because of all the interesting (and distracting) booths.

    More?
    Read More
    • Share This:  
    •  Facebook
    •  Twitter
    •  Google+
    •  Stumble
    •  Digg

    Our New PrintrBot Simple (Metal)

     tháng 5 14, 2014     Hardware and Materials, Our BPC Story     No comments   


    We just got a generous gift of a beta PrintrBot Simple Metal. This time, we actually went to the website as suggested in the instructions! (Our teacher made us read the instructions... pfft.)

    The beta version comes with a depth sensor, so we never have to level the bed. Sadly, the depth sensor was initially calibrated wrong, so the extruder scratched the bed when we went to do a test print. 

    Luckily we found a video on how to fix it and we did. If you get a PrintrBot Simple, make sure to watch this video and check that the depth sensor is properly calibrated before printing or your bed might get scratched. 

    As you can see in the video below, you can calibrate it by putting the extruder on the bed and putting the black piece (included in the set - pictured to the left) on the plate under the depth sensor. If the sensor does not touch the black piece, use the two (included) wrenches to move the sensor down.

    And in case you are wondering, we are using Repetier to control our printer.


    Printrbot Simple Unbox and Print


    And finally... success!  


    This is 3D printer #5 for us. (You can read about the other ones here.)  Here it is printing: